Places to Party

Monday, February 29, 2016

The $5 Chair


I Need Some Love!


On it's own, isn't this the cutest chair? I bought this two years ago at a rummage sale. Marked $8 the owner sold it to me for $5. I just love the paint and definately was not going to repaint it.

I love good design even if it's a common object. I have a lovely necklace pendant in the shape of a ladderback chair. I used to wear it all the time (until one of the legs fell off. Once a coworker asked me if it had any personal significance. "No"  I told her, I just like the design. Maybe I'm weird.

It was the same with this chair. It fairly shouted at me, "Take me home! I need some love!"

So I did. 

And I knew exactly what I was going to do with it when I got it home.

Then it sat for two years still with the same intention.

But today was it's lucky day! Today it's getting it's moment in the sun.

It's no mystery that I love painting. Tole painting is so accessible to everyone that I love showing you how easy it really is because the end result is so impressive. With a little bit of paint you can turn a humble little garage sale chair into a work of art.

The first step in tole painting is to gather all your supplies. You'll need:

*Your Pattern
*Tracing Paper
*Transfer Paper
*Pencil or Pen
*Paint
*Brushes

Let me start off with a common problem that I had. My pattern was well over ten years old. I could not find my paint at Joann's at all. Same with AC Moore or Michaels. You may find one or two but never seem to find all of them in a pattern. If you have a good picture, you can approximate the colors, there are books that translates one line into another line or there are converters available online such as this.

First you will need to determine what size you want your pattern to be. Rarely if ever is a painting pattern (or any other pattern you may want to paint) the same size as the piece you are painting. 

If you decide the pattern needs to be increased, measure the total pattern size. Then determine the size you want the finished piece to be. Remember to add at least 1" to the finished size to give you a little "breathing space. Once you have your two numbers, dived the larger number by the smaller number.

To reduce the size, do the same thing as above but divide the smaller number by the larger number. 

This is how you get the percentage of how much to increase or decrease your size. Take it to a copier and increase or decrease accordingly.


Once you have your pattern, take your tracing paper and trace the design. You use the tracing paper because it so much easier to see your positioning when you lay it on top of the work. Copy all the lines, etc.


Take his tracing pattern to your work and decide where you want it positioned. Once determined, take some painter's tape and take a few pieces at the top to position your tracing. 


To start transferring your image, slide some graphite paper under your pattern. Transfer only the general shapes as it's pointless to draw any details you are going to be painting over anyway.


Using painter's tape which can be found in any hardware paint section, section off the ribbon portion of your pattern and using a small sponge (I cut up a kitchen sponge) sponge two of the corners of the bottom of the chair.


Now, had I used common sense, I would have painted the ribbon first, but as I was following the pictured directions, I did the pine cones so I had to redo my pine boughs..not traumatic but irritating.


Base coat and highlight basic shapes.


Once your paint is dried, taking your graphite paper, mark in the details:


To add details that appear as highlights or low lights, you need to float your paint. What this means is, with a damp brush, load some paint to one side of your brush. Gently brush that paint out on your palette so that the paint slowly seeps across your brush on the water that is still there. 


This allows the paint to gently fade away from the edge which gives a more natural shading or highlighting effect. You are going to add both highlights and low lights to your piece to give it depth.


 Add the foreground details:


And any text:


Once I got the main piece done and it dried, I felt it looked too "new". To age it a bit, I took a sanding block and very carefully sanded away some of the painting to give it a faded look that I felt was more authentic to the chair.


To age it further, I did a technique called "Flyspecking". Using an old toothbrush, dip in in black paint and run your thumbnail across the the bristles (you can also do it with a light paint to mimic snow). It gives you random little circles of color. It's a very attractive treatment although knowing what those little dots really are in real life... well, not really sure why we would want to mimic that.... 


I painted the back of the chair and liking the dots so much, added it around the word "pinecone". 


The easiest way to make dots is simply dip the other end of your paintbrush in the paint and "dot" onto your piece.


Here is the finished piece unvarnished and still in need of a little clean up: 

  
Now the unavailing. All finished and varnished:
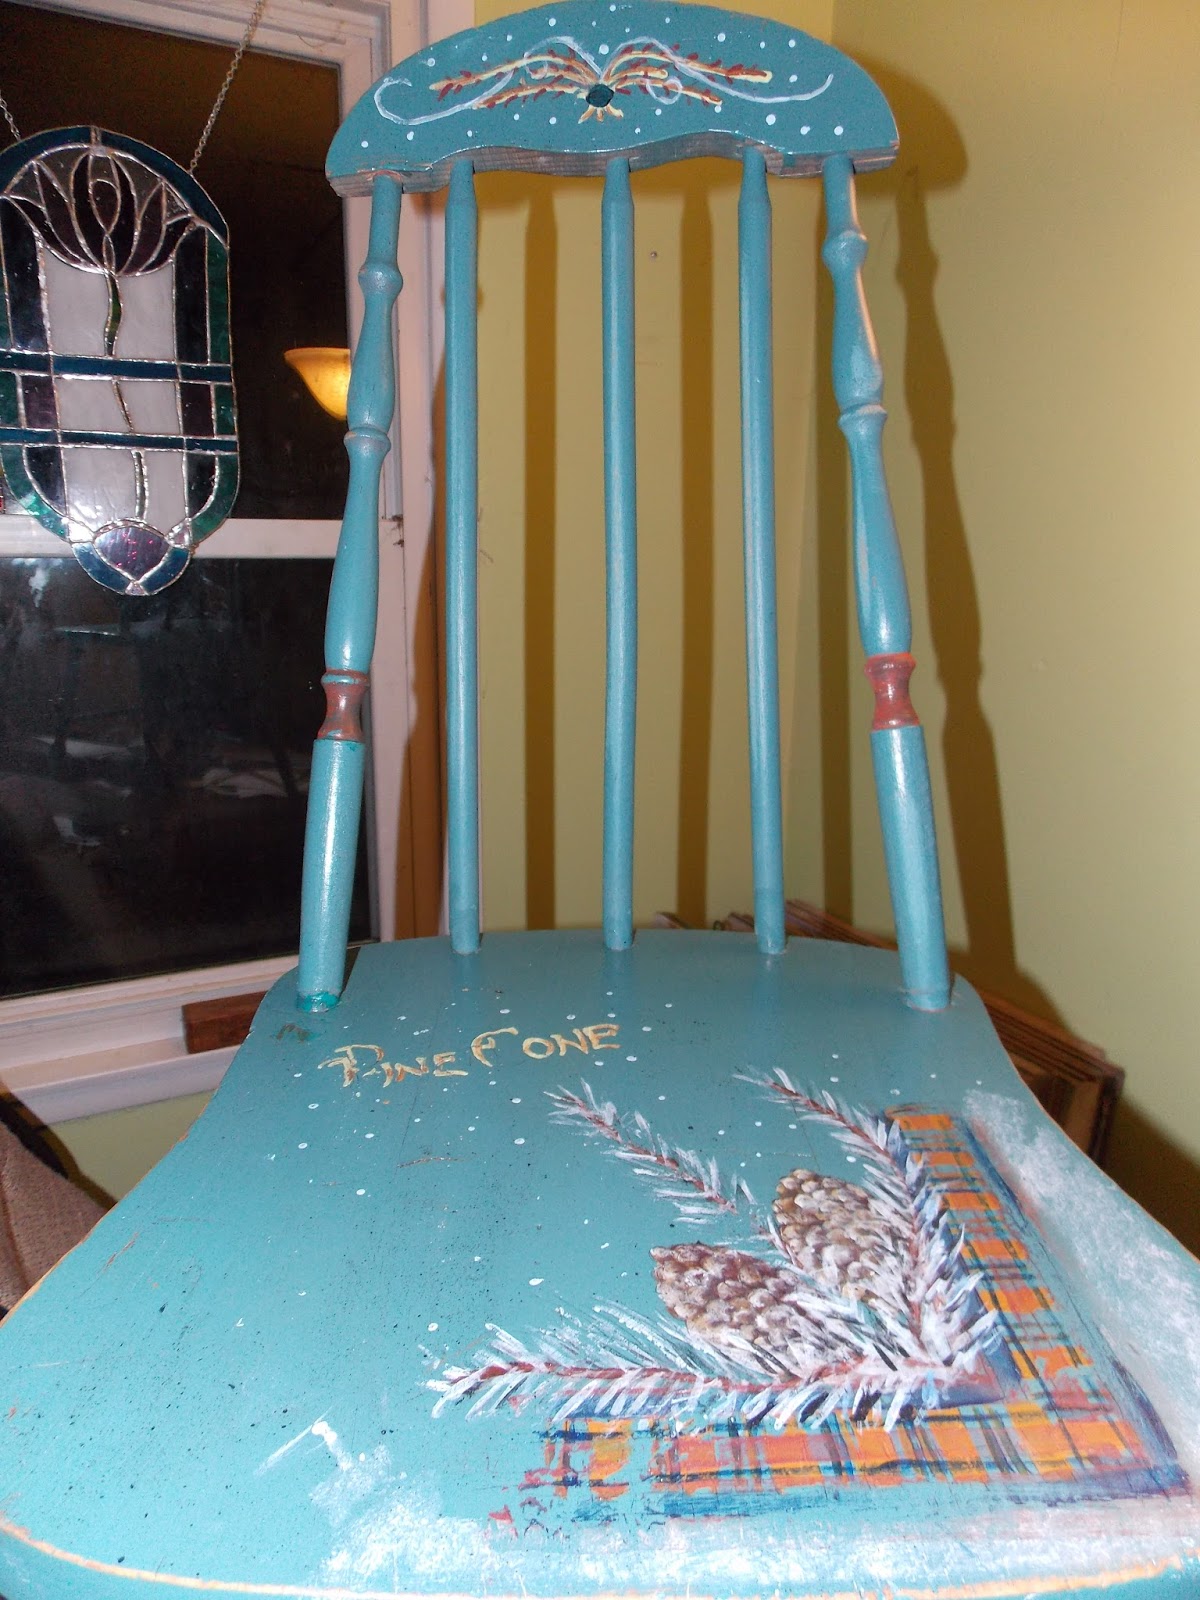


Close up of the seat:


 This is why I love painting! You can take something that is, well, nice on it's own, and with a little paint, transform it into something magical. If you can color in a color book, this is totally accessible to you. Pick up a small pattern or even a child's coloring book and a scrap of wood and try it. I guarantee it's very addicting!


Monday, February 15, 2016

A Great Idea!

Sometimes you come across a great idea you wished you thought of. This is one of those.

Anyone that keeps animals outdoors in the northern portion of the hemisphere, runs into the same problem during winter, how to keep their drinking water from freezing. It's very important but can also be very dangerous. When I was growing up, we had a barn burn down because a cow manage to pull a water heater out of a tank and onto the ground where it caught fire. So it's not something to be taken lightly.


Water heaters can be very expensive even for small animals. And, if your animals aren't the brightest, like my beloved chickens, they sometimes manage to unhook their heaters by flying down on top of them and separating the connection. I swear, sometimes I think they look for ways to off themselves, God love them, they just aren't that bright!

When this even happens, you end up with a solid block of ice that has to be thawed for several hours and you end up putting out some water that you know will be frozen in the matter of hours.

 
What if there was a cheap alternative that, in addition to being free, also had the benefit of being a "green" project, i.e. recycling something you already have on hand? Well, this is it and I'm going to tell you from experience it works and is very safe.


This homemade water is created out of your standard holiday tin that you probably received at Christmas. A hole is drilled in the side and a light hub is threaded through. Attach a lightbulb and plug and you are in business. Isn't this genius? Someone in my niece's 4H club makes these and sells them to profit the club. My mother had this for many years and sent it out to me when I was telling her about the silly girls cutting off their water supply.


I can tell you that at first I was concerned that it could be a fire hazard, but after using it for several weeks, I've run into no problems. Add on to that the hottest it will ever become is the temperature of the light bulb so there shouldn't be too much of a concern. It works just as good as those expensive heaters as well.


Monday, February 8, 2016

Winter Butterflies in Shades of Frost


It's been a mild winter up here in western New York and after last year's copious amount of snowfall, we couldn't be happier. This past week we had a 54 degree day in February!


While we are so grateful to have been spared (so far) a massive amount of mother nature's mantle, it's still a bit depressing to see all the wilted and dead plants everywhere. So if nature won't provide the butterflies to liven up our days, we'll just have to put our noses to the collective grindstone and make our own!


Today's mini project is from Laundry Basket Quilts and makes a quilt that is 14"x18 1/2".
I thought the quilt would be bigger when I initially bought it but found to my delight that simply because it was so small, it could easily be completed in a weekend or weekday. Additionally, because it uses such small pieces, it's the perfect project to use up all those tiny pieces of fabric that are too cute to throw away but not big enough to do any serious project.


I did this quilt with what I had on hand but if I were to do it again, I would definitely start with the paper backed fusible webbing that I used for the center of each butterfly to do the wings as well. In that way my butterflies would all look the same instead of the various different ones you see here.

Then again, all butterflies in nature are unique aren't they? Why should I think I'm any better than mother nature?

So some of my butterflies look a little moth like and some more swallowtail...
New from bad lighting theatre....

I used fusible webbing that I sewed glue side to right side and then rolled out. I used closed scissors to run across the seam on the inside to make it crisp and so I got all these weird little shapes.


I cut out the background and using the pattern for placement and an iron, ironed the pieces together to give me the wings.


Then, after I finally got smart, I bought some paperbacked fusible webbing and ironed on the center fabric, after it was fused, I drew the center and cut it out. Once adhered, you simply peel off the paper backing, position it where you want and iron it down. This is a new favorite that I just discovered and will be using in the future!


Paper backed fusible webbing  is so much easier when pieces are really small like the butterfly bodies!


Stitch everything down and join all the blocks. What I really liked about his project, other than it being absolutely adorable, is that could easily be done in a weekend or even a Saturday. The fusible webbing makes all the difference. I think the final project came out really nice, this may end up on the summer porch this year! 


Sunday, January 31, 2016

So Very Sad

You may have noticed that the blog was not updated last week. The reason wasn't laziness, rather it was shock.

I found out via Facebook last week that someone I considered a friend had killed herself a week ago last Monday.

Annemarie was dead. By her own hand.

I didn't ask how she did it as it really seemed to be irrelevant. I knew she had a lot of drama going on in her life that she posted on Facebook but when I would ask if she was alright, she would never answer and as we were friends via work, I never felt I had the right to press.

She left behind a husband and child.

I met Annie first as a teammate at work and later she was my boss. Annie and I shared some interests and I really liked her as a person. I always felt she had been through something in her life as she seemed a bit fragile, but she always struck me as a strong person. I guess that is why her death struck me so hard, I never saw it coming.

She was young, only 40 years old.

It so saddens me to think that Annie saw no other way out for whatever was going on in her life than to kill herself. It saddens me that she didn't see what a great person she was and what a value she was to the world. Then again we never truly goes on in someone else's private life and so many of us put on brave faces to the world when our hearts are breaking.

If you read this today, please pray for Annie. I pray that she has found peace and her soul is healing. I pray for her family and all they are going through. Annie was a really good person, a kind person, and I firmly believe that our prayers help those who are now in spirit. Prayer is energy and can only help a being that is now energy.

And I ask you to be kind to each other. We never know when a kind word may be all that someone really needs to hear to pull them away from that cliff.

Thank you all.

Monday, January 18, 2016

Hello Sunshine! Looking Towards Spring!

Really we can't complain....

We had a 70 degree Christmas after all.. thank you El Nino, come around anytime!

But now it's freaking cold and snowy and ::Sob:: I want Spring!

I really hate going to work in the dark and coming home in the dark, know what I mean?

I miss birdsong! I miss daylight! I miss flowers and even green weeds!

So, like many of us, I need something pretty to color the drab grey days.

Winter always seems like the time do do stained glass, I don't know why. I guess during the spring and summer there is so much to do outside that winter is the time to buckle down and do what we can indoors.

This pattern is one I've made a smaller version here. It's small and I used leftover glass to make it.The soldering also leaves a lot to be desired. I'm getting better though..!


I've always wanted to make a larger size. What I especially love about this pattern is that it looks spectacular but it's easily accessible to the beginner who wants to do stained glass because the majoirty of the lines are straight lines or soft curves. This is the pattern  book I bought on Ebay. I do not see it on Amazon but you could look for it where I found it.


 Because I decided to do this 'on the fly', I did not have any opportunity to copy my original so I simply traced two versions of the pattern from the original. Number each pattern piece the same on both. One pattern is used as a template and the other for your actual pieces to cut out.


 In stained glass, we use a special scissor that cuts out  some of the pattern. You can use normal scissors as long as it's relatively free form like this pattern (i.e. it doesn't have to be a specific size) but if you are making something in a frame, you will need to shave down your pattern so it fits. 


As you can see, these scissors have double blades with a space in between that shaves off some of the pattern. You can find stained glass equipment here.


Showing the space it cuts out.


Cut each pattern piece out from the pattern and with a Sharpie marker mark each pattern piece on your glass along with the number of that pattern piece. This is IMPORTANT as after you cut your piece they begin to look the same but they may not fit the same so you need to know what goes where.


Using your pistol grip cutter, score on the line your chosen piece of glass. When doing a curved piece, score and break away from you, supporting the piece you want to keep with the pliers.


Straight lines are a bit easier as you can see. 

As you are cutting your pieces, lay them out on the pattern as so to get a feel over what you may have to re-cut, sand down or snip away to make your pieces fit together.


Solder doesn't stick to glass so you have to put a sticky backed copper foil on the glass to get the solder to stick. I usually try to place the cut end on and inside area and overlap the tape by about 1/4" so that we don't have an abrupt end that may leave some exposed glass where no solder can adhere to.


As you foil it lay it out. I always wish it would stay this pretty copper color and have yet to find any solder that is actually copper color. It's so pretty but alas it is not to be. I bought one that said it was copper and used it on this but it was to make a copper patina, not really what I wanted.


As you foil, lay out your pattern to make sure everything still fits and you want to straighten the edges. My glass teacher made the point that you can always adjust in the middle (add more solder etch) but if your edges aren't straight, everyone will be able to tell.


Adjust where you need to to get your outside edges as straight as possible.


Right before the area you want to solder, take a little flux on a brush and brush a little on the area. Then come in with your 60/40 solder and join them together. Too much flux will cause the solder to sputter. When first doing stained glass it's normal to do this until you get the feel of it so don't beat yourself up if it happens.


The soldered piece. Not perfect but no too bad!


Here is the finished piece, cleaned up and with what daylight we can get in January. Just a little bit of color to an otherwise grey month.


Monday, January 11, 2016

Small Projects to Start the Year

Happiest of New Years to All!   

Can I just say this... I'm so glad the holidays are over!

My brother and I many moons ago.


As joyful as they are, they are also incredibly stressful. Add on to that a bout of stomach virus which laid me up for three and a half days (and I went on an interview while I had it to boot!) and this season of joy was a bit tarnished. If you are a crafter, it can be ten times as stressful as you push yourself to get that last project done in time to send it off to it's recipient in time for the holiday. 

Sometimes it takes the joy out of making something.

                .....And I love making things, so that sucks.

Now that the holidays are over life can calm down and not be so frenetic, and we can once again make things because we like to make things (or get a head start on next year's projects if we are so inclined). 

For the first few projects of the new year I wanted to do some quick projects. I still have two major quilts to finish for gifts SOMETIME during the year (didn't quite make it for Christmas) but in the meantime I need a to create a few things that can be done in a weekend or less. I like instant gratification!

For the first project, I decided to make this lovely wall hanging from  "A Cut Above".
This little unassuming book has several fun and quick little projects that you can whip up in an afternoon. Today we are going to make the Star/Square in a Square wall quilt project.

"Square in the square".

 MAKE THE SQUARE IN A SQUARE:

First we'll start with the square in the square.


We take a square piece, in this case 4 1/2" and we use a smaller square (2 1/2") in each corner and sew from diagonal to diagonal. Clip off the corner and iron it flat. Once this is done, you clip off the corner and do this on the other three corners.


Ultimately this is what you are going to get:


Trim it and add three more sides. Trim that up to a square.


MAKE THE FOUR PATCH.


This is a simple four patch square. You make it by sewing together 2 1/2" squares together to make 2 four square blocks. If you were making an entire quilt out of this pattern, you would make up strips that were 3" wide and then cut them at 2 1/2" increments. (You are going to loose 1/4" off of each side for the seams).  That would make the sewing a lot easier. Square it up so all sides are straight.


MAKE THE STAR


The star pattern we've done on a previous project from this book, here. Essentially there are two different ways of making the flying geese patterns that surround the four patch. If you have the flying geese ruler, you can follow the Eleanor Burns method, which, after making the peony, I'm somewhat of an expert on. Her method takes a bit of time but for each go around, you get two geese which makes the process go a bit faster


If you don't have the ruler, a simpler method is the square and rectangle method which is just like the above square in square only this time we are using a rectangle. Simply make a rectangle to the desired size and two squares of fabric. Put each, right faces together on either side of the rectangle and sew on the diagonal towards the center. Lop off the excess and press.
And if you have not got into the habit, make the resolution to start assembly line sewing, it saves SO much time. Just like cooking, it takes no more time to do all the pieces at once then it takes to make one, so save yourself some time but doing all your pieces at once instead of individually.


Join your flying geese to your four patch


 Square it up and sew the square in a square to your star blocks and just like that your center is completed! Pretty!


Add a frame with some background fabric and some rectangles sewn together.


Then we are going to do some fusible applique for the flowers and leaves. If you have never done this method before, it's actually very simple.

Cut your applique piece out. Using the "bumpy" side facing the "right" side, sew pieces together. Once completely sewn, cut a slit in the back of the fusible webbing and turn the applique inside out. Make sure all the edges are firmly pushed out. You can use a variety of tools to do this. A clean popsicle stick, a crochet hook or, being very careful, your sewing scissors.

After all the pieces are fully crisp and turned, place your applique where it pleases your eye. Then simply iron down. Once ironed, sew it in place. Continue this method until the piece is done in your eyes.


Once the piece is completed, wash and iron it. Now frame it as instructed in the last post, "Framed". Turned out quite nice.