If you have ever taken a piece of artwork, picture or hand stitching to be framed you probably got the surprise of a lifetime...

I did a little piece of cross-stitch while on vacation. I took it to a craft store frame shop and found out that that little piece would have cost me almost $400 to frame... and that was after I used a 65% off coupon!
Um..No thank you.
Today I'm going to show you how to frame your artwork/projects and save you a lot of money.
I mean, a lot of money...
When I first came to Rochester, I walked into a Michaels for a part time job until I could find a full time one. The manager looked at my resume and said, you're crafty, you're a framer!
But I was taught and I routinely had the displeasure of shocking people when I told them how much their little piece of artwork would cost them to frame.
Framing still isn't cheap by any means but if you can get your artwork to a standard size, you can cut the cost by quite a bit.
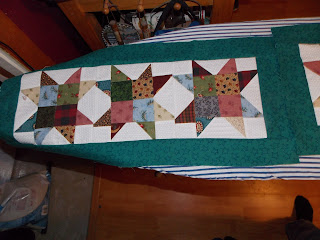
Remember this piece I made early this year? The tutorial was here.
First we need to gather supplies. The important thing here is that your mounting board be acid-free.
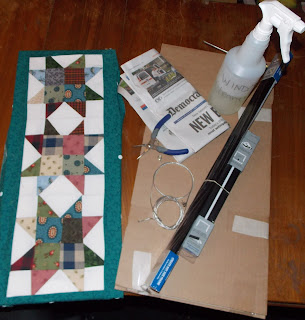
Supplies:
Acid-free mounting boards*
Tacks
1 set of frames the width of your project*
1 set of frames the height of your project*
Wire
Pliers
Glass cleaner
Newspaper
Plastic bump outs
Measure out the size of your artwork and try to get it to the next solid number, i.e. 24 instead of 23 1/2". Art stores often have a framing department and there you can get just about everything you need to frame your piece... and usually, they'll even cut some of the materials for you.
Once you have the size you need, make a trip to your local art store and ask for some acid free mounting board. This mounting board will be somewhat solid on the outside but "cushy" on the inside. It's important that it is acid free (they do sell some that aren't for other purposes) because otherwise it will yellow whatever image/artwork you are framing overtime. This is what happens with all those old pictures you have in your old photo albums.
 While you are at the art store, wander over to the framing area. Until recently, your
Jo-anns, Michaels and AC Moores used to carry these:
These are two sides of a frame as well as the connections and pressure clips. Essentially, you can buy the two sizes you need for any piece. My piece was 10" x 24" so I purchased a 10" kit and a 24" kit.

Mount your artwork over the cut foam board. I used simple tack pins to hold them to the edge. It will eventually rust but I'm not real concerned about a tiny bit of rust on the end where no one is going to look.

Like so:


Slide in the side pieces from the other kit and screw down. This creates tension and holds both pieces together.

You want to make it so the corners are tight so there are no gaps on the face of the frame.
You will only want to put three of the sides up so you can slide in the glass but essentially if you put the entire thing together, this is what it will look like.


If you are not using a mat board, this is the point that we would take out the bump outs. My piece did not have any space so eventually it may adhere to the glass. If you are concerned about this and not using a mat, you'll want something to create a bit of space between the glass and the artwork. At the frame shop, we had little strips of sticky acrylic that we would stick to the frame, but when I've asked for these, no one seems to know what I'm talking about. A good alternative are the bump outs you would use on the back of your frame anyway to protect you wall. Cut them in half and place the cut side towards the top of the frame so that it won't show when you slide it into the frame, it may take some trial and error to prevent it from being seen. Place the sticky side against the glass.

Your kit came with some funky little flexible clips remember. What do you do with them?


Press them down and slide them underneath the frame. This creates tension and keeps your artwork in place.
Now your frame is complete but you need to hang it somehow. Hangers are provided in your kit. These aren't my favorite as there is no real way other than tension to make sure they stay in place but this is what comes with it.

Please notice the spacer clip underneath the clip here.
When I frame, I like coated picture framing wire because it's easier on your hands but it is entirely up to you what you want to use and what you have on hand. Thread through your wire through the hangers and leave a tail.


Twist your wire to hold it in place. If you like, you can also wrap the end about two inches with masking tape if you desire.


Sticker Shock.
It costs how much?
I did a little piece of cross-stitch while on vacation. I took it to a craft store frame shop and found out that that little piece would have cost me almost $400 to frame... and that was after I used a 65% off coupon!
Um..No thank you.
Today I'm going to show you how to frame your artwork/projects and save you a lot of money.
I mean, a lot of money...
When I first came to Rochester, I walked into a Michaels for a part time job until I could find a full time one. The manager looked at my resume and said, you're crafty, you're a framer!
I never had framed anything in my life.
.........and gave me full time.
.........and gave me full time.
But I was taught and I routinely had the displeasure of shocking people when I told them how much their little piece of artwork would cost them to frame.

Framing still isn't cheap by any means but if you can get your artwork to a standard size, you can cut the cost by quite a bit.
Remember this piece I made early this year? The tutorial was here.
First we need to gather supplies. The important thing here is that your mounting board be acid-free.

Supplies:
Acid-free mounting boards*
Tacks
1 set of frames the width of your project*
1 set of frames the height of your project*
Wire
Pliers
Glass cleaner
Newspaper
Plastic bump outs
Once you have the size you need, make a trip to your local art store and ask for some acid free mounting board. This mounting board will be somewhat solid on the outside but "cushy" on the inside. It's important that it is acid free (they do sell some that aren't for other purposes) because otherwise it will yellow whatever image/artwork you are framing overtime. This is what happens with all those old pictures you have in your old photo albums.
 While you are at the art store, wander over to the framing area. Until recently, your
 Jo-anns, Michaels and AC Moores used to carry these:


Mount your artwork over the cut foam board. I used simple tack pins to hold them to the edge. It will eventually rust but I'm not real concerned about a tiny bit of rust on the end where no one is going to look.
Take out your framing pieces. There will be two pieces for each side, one with two screws and one that is flat. Put the screw piece on top of the flat piece and slide it into the panel.


Slide in the side pieces from the other kit and screw down. This creates tension and holds both pieces together.

You want to make it so the corners are tight so there are no gaps on the face of the frame.
You will only want to put three of the sides up so you can slide in the glass but essentially if you put the entire thing together, this is what it will look like.
 |
| Woot! Woot!.. starting to look professional! |
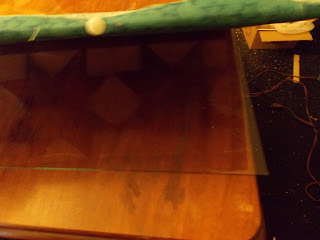
With your glass cleaner (my homemade version is here), spray your glass and use a newspaper to wipe it down.

This is a trick I learned at my first job working at McDonalds. Newspaper makes your surface really shiny and leaves no lint.

If you are not using a mat board, this is the point that we would take out the bump outs. My piece did not have any space so eventually it may adhere to the glass. If you are concerned about this and not using a mat, you'll want something to create a bit of space between the glass and the artwork. At the frame shop, we had little strips of sticky acrylic that we would stick to the frame, but when I've asked for these, no one seems to know what I'm talking about. A good alternative are the bump outs you would use on the back of your frame anyway to protect you wall. Cut them in half and place the cut side towards the top of the frame so that it won't show when you slide it into the frame, it may take some trial and error to prevent it from being seen. Place the sticky side against the glass.

Create your artwork "sandwich". Foamcore, artwork, (bump outs), and glass.
 |
| Slide the "sandwich" in the frame. |
With one side of the frame still open, slide your "sandwich" into the frame.
 |
| Once in, put the framing pieces in both ends and attach the last side. |
 |
| All set! |
Slide on the last side and screw down taking care to make sure there are no gaps on the frame showing in the front.
Your kit came with some funky little flexible clips remember. What do you do with them?

Their purpose is to make sure the artwork is taunt in the frame so that it doesn't wobble.


Now your frame is complete but you need to hang it somehow. Hangers are provided in your kit. These aren't my favorite as there is no real way other than tension to make sure they stay in place but this is what comes with it.
 |
| Forgive the bad lighting, this is a one woman operation. |
Pop it into place. Measure down on the other side and do the same so each are equal-distant on the frame and your frame will hang straight.

Please notice the spacer clip underneath the clip here.
When I frame, I like coated picture framing wire because it's easier on your hands but it is entirely up to you what you want to use and what you have on hand. Thread through your wire through the hangers and leave a tail.


Do the same on the other side.

Turn it around and admire your work. You have now framed a picture of your very own!

Great job!


