
When you make a homemade gift for someone, you never know whether they really want it or if it's something that they accept to be nice. I, at least, never am sure. But then someone says something about something you made that really makes you realize how valued it is.
I've been basketweaving since the early nineties and back then, made a lot of baskets.
When I moved, I left a lot of baskets at my parent's home. I really didn't think anything about it until last week.
"Your brother wants you to weave him a basket", my mother said.
"Chris wants a basket?"
"Yes, he saw the one I use all the time and I told him you made it", she said.
"Well, she needs to make me one", was my brother's response.
Cool.

Guess what both of you are getting for Christmas! Woot! Woot!
So for today's tutorial, we are going to make one of most useful baskets you'll ever use, a marketing basket. This is perfect for gathering produce from the garden or when you go the farmer's market. I've used it to hold crafting supplies or anything else your heart desires.
With an open weave basket, it allows dirt to flow through so if you are gathering garden goodies, put them in the basket and spray the entire thing with a hose, baskets actually need to have that done about once a year to prevent them from becoming brittle. This is the basket you will weave again and again. You may weave it for yourself, but if you're friends see it, I'll guarantee, they'll want one too.
This basket is going to feature two new techniques/focuses. First is color theory, the second is a wrapped handle.
On a side note, please forgive my hands. I just finished staining and painting the chicken coop and I have a lovely "stain" manicure.
HOW TO DYE REED
An easy way to add character to your basket is to add color. While there are some places that sell pre-dyed reed, let me demonstrate to you how arduous this process is.
To Dye Reed:
1. Bucket2. Hot Water
3. Dye
4. Reed.
Put hot water in bucket. Dump your dye and dissolve. You can use RIT dye which is one the easiest to get, or specialized basket dye. Dye is dye unless you are doing something with walnut hull
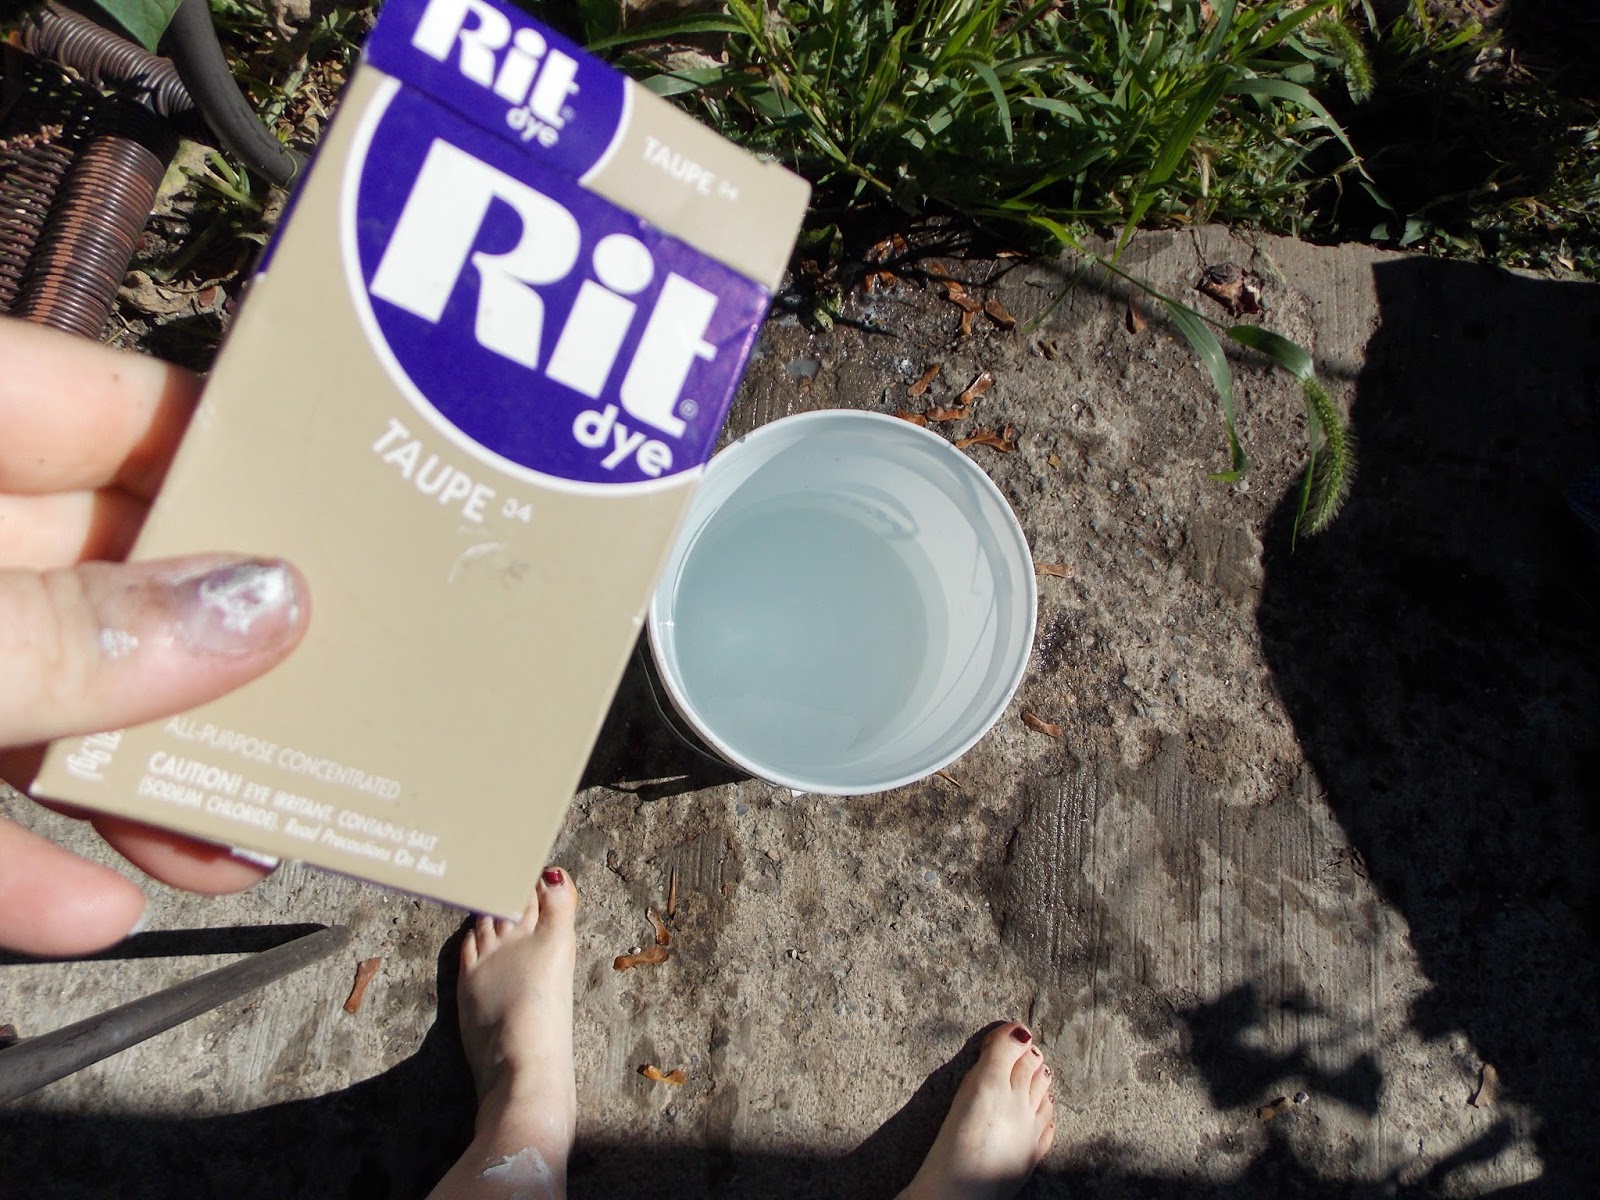

Put in your reed.
Fill with water to cover and if your reed floats, put something on top to weigh down (I had a pumpkin close by, hehe). Remove when the color reaches desired consistency and dry on towel, tarp, etc.
THE FARMHOUSE IN THE FIELD MARKETING BASKET* (Snazzy Name huh?)
BASE:
1 D handle, mine was 10" x17". "D" as you can see refers to the shape of the handle, put it on the side, it looks like a D
(The base of the handle will determine how wide your basket will be.)
Mark centers of each piece of reed.
(8 pieces) 1/2" to 5/8" flat/flat reed, cut 45 inches, four of these dyed if desired
(14 pieces) 1/2" to 5/8" flat/flat reed, cut 36 inches, 8 dyed, 6 plain
(4 pieces) 3/8" flat/flat dyed, cut 36"
WEAVERS:
(19 pieces) of reed, 12 colored, 2 plain, any sizes necessary to build the sizes as tall as you wish.
#2 round/round
RIM:
(2 pieces) 1/2" Flat/Oval
(1 piece) Very long flat over piece to lash around entire basket
Filler pieces
Jackknife, paring knife, something to shave off reed

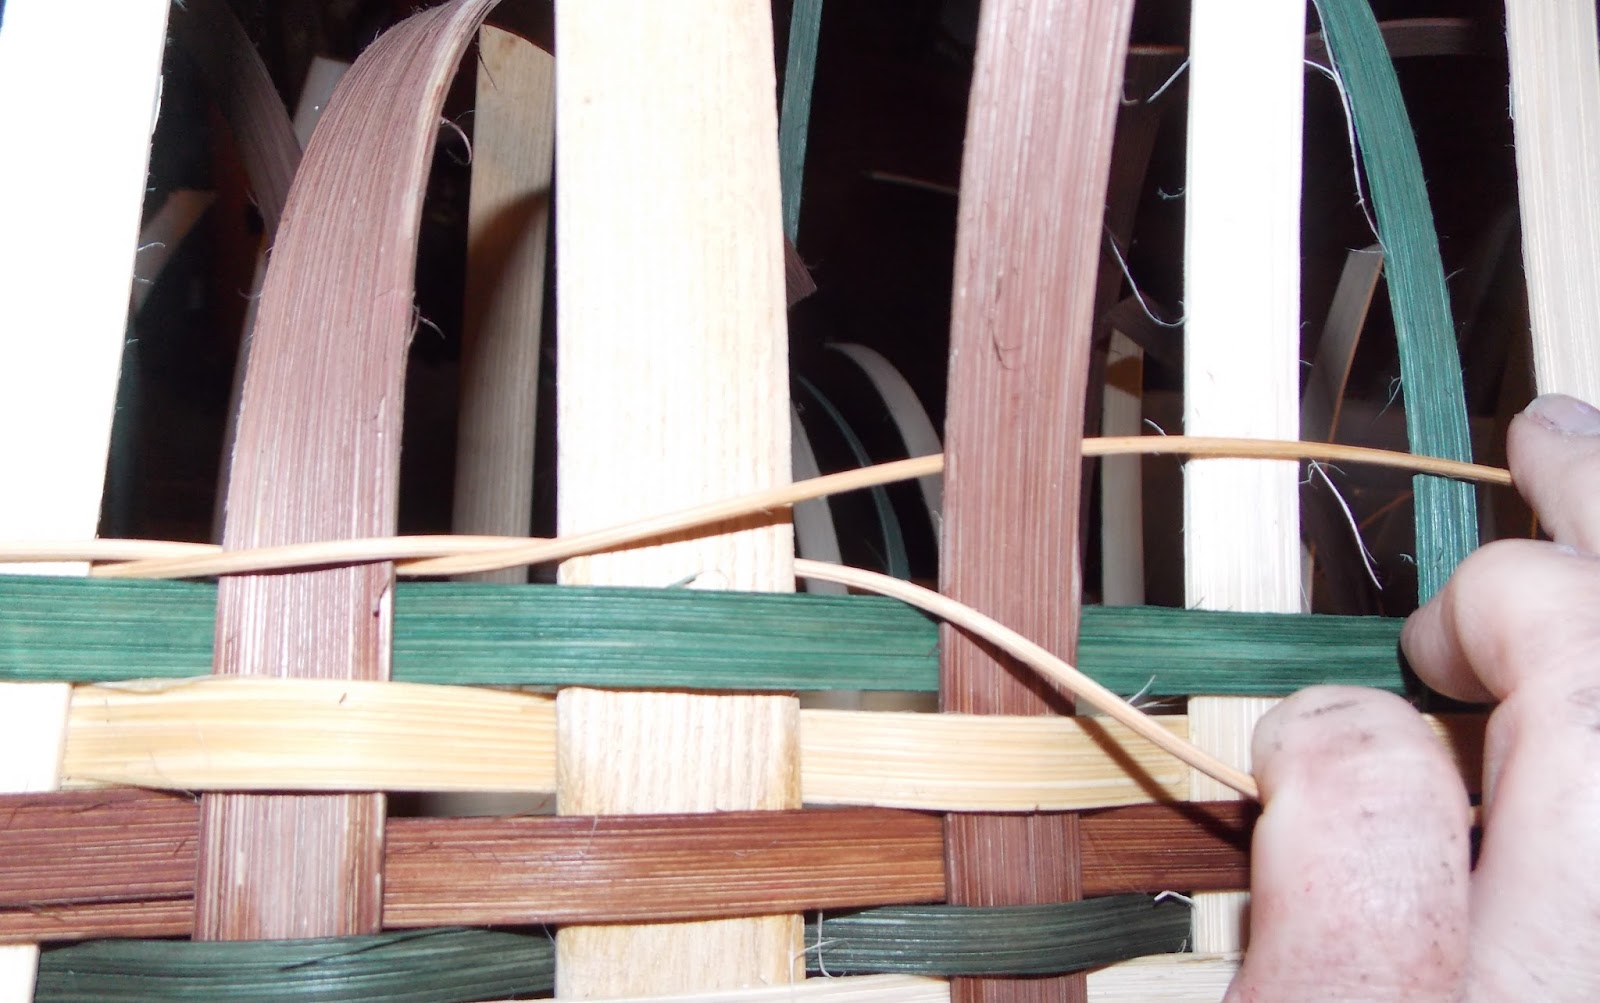
Soak all reed, but not your handle. Beginning with you 45" pieces, lay them horizontally in front of you, rough side up (you'll see little hairs on the "wrong" side, more so than the "right" side) . You may use a big book or similar object to hold them down.
Position your handle in the center of the basket on top of your center marks.
Weave the 36" pieces vertically on either side of the handle, rough sides up.
This is where we are going to discuss color theory....
Plain baskets are beautiful because it really makes the texture of the basket stand out. But sometimes you want color, something to accent a room, or maybe just to add color to float your boat.
 |
| Negative space gives the eye a place to rest. |
In this case, I wanted to give the basket a "plaid" type of design. It's for my brother so I wanted to give it a more "masculine" feel to it. So you'll see, color, plain, color, plain etc. Then when we start to add the weavers any place color crosses color will give us a "plaid" effect but there is enough negative space to prevent it from being overwhelming.
Once the base is in place use a small piece of waste reed to space the weavers out evenly. I used 1/2 inch. Once you have it spaced in a way you want it, use snap clothespins to hold each corner.
Take a long piece of #2 round/round and gently pinch in off center. Loop this around one of the bottom weavers and weave around at least three times. If/when the reed runs out, simply tuck it in the previous weaving and begin with a new piece. If you are unsure of how to do this, refer to the strawberry basket here.
Once you have all three rows, simply clip each end of the round reed at the starting two reeds on the inside. You are now done with the round reed for now unless you want to add twining later in your basket.
Now quickly soak your basket being careful not to soak your handle too much. Handles are generally glued together and the soaking will cause them to separate-the reason we are so careful with them.

Remove the soaked basket and GENTLY, begin bending the sides up towards the handle of the basket clipping to keep them together. Now we are building the sides. Starting at least five reeds away from your handle, weave your first row of weaving going inside and outside of each of the reeds.

Once you are at the beginning of first reed, weave past four reeds ending on a top reed cutting the end here and tucking it behind a weaver. Again, refer to the strawberry basket for more detailed directions here.
Weave as far up as you desire, leaving about five to six inches so you can cut and tuck the ends of the reed. We need to start twining three to six rows of round reed so that we can put a border around the top of the basket.

To begin twining, on any two reeds without a handle, put one piece of round reed.
When you run out of a reed, just end in the back of the spoke and insert a new end of round reed crossed on top. Continue weaving. When you get to the first two reeds after your 3-6 rows, clip each reed at the starting spoke.

Cutting an tucking time. (Sounds like something from Hee Haw?)

Re-wet your basket taking care with the handle. Gently fold down each spoke and measure down to a point that you can tuck it inside a weaver like so. Cut and tuck it making sure to hide the ends as so. A long flat head screwdriver works amazing for this.
Once we have all the ends cut and tuck we are going to work on the wrapped handle.
Simple Wrapped Handle
 A wrapped handle is not only for a decorative fancy but also makes the basket handle sturdier and it feels good on your hands. For this simple wrapped handle, choose a piece of dyed reed that is longer by about 8" than your handle piece. Wrap it around the handle and see if you have enough to tuck in.
Soak all reed. Begin by putting your 1/4 half round reed with the round side against the basket, bend and start wrapping around the handle.
 |
| Forgive my lovely "stain manicure". Someday I'll remember to wear gloves. |
You can create your own pattern by determining how many you want to cover and show. I did a five wrapped, two unwrapped. Wrap as tightly as possible without overlapping.


 When we run out of reed, bend on one section down and tuck it into your previous weaving. You may have to loosen it then tucking it back in. Butt up a new reed with a tail and start weaving around that tail.
Weave all around until you reach the other end and tuck it in the back of the basket.
Here is my mother's basket handle. This time I did the same just with two pieces of 1/4 flat/flat and I staggered the wrapping.

Here is my mother's basket handle. This time I did the same just with two pieces of 1/4 flat/flat and I staggered the wrapping.

To Rim the Basket.

Taking a paring knife, start from your marks and carefully shave any excess material from both sides. Periodically lay one on top of the other to gauge when they lay flat. Once they do, lay that piece aside and repeat the procedure for the inside of the basket.

This is where this gets tricky.
Rimming the basket can be hard on the hands. With the longest piece of #2 or #3 flat oval, cut a slanted piece so that you can insert it from the back of your weaving, underneath the twining, up through the twining, back down and underneath the twining again like so:


With a LOT of clothes pins, attach both rims making sure they are on the correct side and the borders overlap as flat as possible.


When you come back to the beginning, you have a choice to make. You can either leave the basket with one round of lashing or you can cross backwards all the way around until you reach the front, both are perfectly acceptable ways of finishing the basket.
When finished lashing, repeat the procedure that you began with to finish the lashing. You will need a screw driver, awl or something to open the space to pull the lashing through to the bottom of the basket. When finished, simply cut both ends of the lashing.
Burning Your Basket.
No we aren't loosing our minds. See all these lovely "hairs" popping up everywhere on this basket? Have you ever seen a hairy basket anywhere? No. These "hairs" need to be removed and the way to remove them is to wet the basket and burn them off.
Wet your basket thoroughly, again taking care of the handle. Now with a hand held small lighter, go around the basket anywhere you see little 'hairs' and singe them off. Afterwards you may have to take a sponge or dishcloth and wipe off the black soot marks.
Staining the Basket.
To finish you basket you can leave it raw if you are using it strictly for decorative purposes, but if you intend to actually use it, you will want to put some type of sealer on it. Do not use polyurethane! It will make the basket brittle. One of the easiest things to do is use wood stain. It comes in many colors including clear and will protect your basket for years of use.
Golden oak, clear, puritan pine are several really good choices. You can also use clear and mix a bit of color into it or use one of the many colored stains.
After you make a few baskets, you'll begin being able to finish them in a day depending on the size or intricacy, or at most, a couple of days. Its a useful skill that many of our great grandparents probably knew and it's ready for a come back.
 |
| Chris' basket |
 |
| Mom's basket. |
* Copyright Stacey K all rights reserved. I give permission to use the pattern for creating baskets for personal use or sale, teaching etc. Any renaming of this pattern and selling it under this or any other name is strictly prohibited.
This is awesome! Do you think you could dye a whole basket?
ReplyDeleteOh wow you make it look so easy but I bet it isn't, a great result #CreativeMondays
ReplyDeleteThanks!
ReplyDeleteYes you can dye the entire basket. Another really nice treatment is with oil paint and linseed oil. Not so useful for a basket you intend to use but it's a beautiful aged finish.
Your baskets are beautiful! Thanks for sharing them at the Vintage Inspiration Party - I'm pinning it to my "Spotted at the VIP board here - https://www.pinterest.com/knickoftime/spotted-at-the-vip-vintage-decor-repurposed-projec/
ReplyDeleteHi from one basket weaver to another! Stacey, I wove baskets for more than 10 years and traveled around doing art shows. I recently did a blog posting showing some of my baskets that I made and kept. I dyed my own reeds, and attended basket weaving conventions in Michigan. It's a lot of work, but I actually found it quite relaxing. I know paint with watercolor and have pretty much given up basket weaving, although I might try weaving a large tobacco basket.
ReplyDeleteSo Glad you all stopped by!
ReplyDeleteThanks so much for pinning me Angie, I love your blog!
Carol, I'm a mid Michigan girl myself, baskets where big out where we were. I also love to paint as well! We're twin souls I think!
Coombe Mill... it is easy .. and fun!
Wow amazing, love the colors!
ReplyDeleteOh wow! That is amazing!!!!!!!! I never knew someone who would actually make baskets like these. Wow. Thank you so much for bringing this to the SHARE IT linky party at FineCraftGuild.com I love learning things like this. Hope you'll continue to bring projects like this to us over time! ~ Rose
ReplyDeleteWhat wonderful baskets. Thanks for the tutorial and the hints. I am sure your brother will be so amazed at his gift.
ReplyDeletehugs,
Jesse
Thank you for a wonderful tutorial. Several years ago I had a friend who made baskets. We organized a mom's night a few weeks in a row and she taught us how. It was such fun and I will always have my heart shaped basket to remind me. Your baskets are beautiful. :)
ReplyDeleteWow! That is so neat to see how a basket is made! Thanks for sharing with us at the Merry Monday link party. I hope you'll join us again next week. Sharing your post on Twitter!
ReplyDeleteBeautiful, It is really nice to see how the basket is made, thanks for sharing with Hearth and soul blog hop, pinning, tweeting and featuring on this week's blog hop.
ReplyDeleteWhat a gorgeous basket, with so much love woven into it! Thank you for sharing this tutorial - I have never made a basket before but your step by step instructions are fantastic! I, too, will be featuring your post at this week's Hearth and Soul Hop!
ReplyDeleteWOW!!! This is simply stunning. I've never seen anyone hand weave a basket before and am very impressed!
ReplyDeleteWhat a wonderful tutorial Stacey! It's one of the things I'd love to learn some day, so I'm going to save your tutorial and try my hands on it later. Your baskets are beautiful! Thank you so much for joining the Simply Neutrals party! I'm sorry to be so very late in visiting this week, life got in the way. Wishing you a beautiful day! Wen
ReplyDeleteI have a new appreciation of baskets...they're just beautiful!
ReplyDeleteWow! I can't believe you made that! Seriously amazing! Thanks so much for sharing with us at the Talented Tuesday Link Party - so glad you linked up!
ReplyDeleteGreat works! Thanks for the tutorial
ReplyDeleteGreetings from Germany
Amazing tutorial!
ReplyDeleteThanks everyone!
ReplyDeleteYOu are so very talented! Love the basket and the colors you used.
ReplyDeleteOh wow...this is so great!
ReplyDeleteThanks for joining Cooking and Crafting with J & J!
Oh my gosh Stacey. The time! Not just in the weaving, but in the tutorial! Thanks so much for sharing this one at Five Star Frou-Frou. You are one clever chicken! Mimi xxx
ReplyDeleteVery cool, I miss weaving baskets
ReplyDeleteWow, these are gorgeous! I've always wondered how to make them and your great tutorial makes it seem possible. I'm going to try it! Thanks for sharing on Tips & Tricks!
ReplyDeleteWhat a beautiful basket Stacey! I would love to try this someday :) Thanks so much for linking this up at the Bewitchin' Projects Block Party last week. You are one of my Featured picks over at Recreated Designs tomorrow. Hugs, Lisa
ReplyDeleteWhat an amazing process Stacey... one that I assume requires a little patience. The finished baskets are totally fabulous!!
ReplyDeleteThank you for linking up at Create, Bake, Grow & Gather this week.I hope you will continue to share your awesomeness with us in 2018.
May your New Year be filled with lots of creative endeavours!!
Hugs ~ Kerryanne