Places to Party

Sunday, September 29, 2013

Preserving with PIE


ONE WORD TO DESCRIBE HAPPINESS...
          

             PIE 


I like PIE, do you like PIE?

Yes, I like PIE, do like PIE?

I like PIE, He likes Pie and She Likes Pie

WE ALL LIKE PIE.......


This is my husband's pie song that gets sung in our house anytime I mention I may make a pie.

Pie is special. Pie is good. Everyone likes pie.

What you may have not thought of is that pie can be part of your preserving strategy. Que?

I don't know why it never occurred to me to preserve with pie, but in a recent conversation with my mother she mentioned that she often makes pies in the summer and just places the entire thing, not baked into the freezer. She said she often then pulls them out anywhere from six months to a year and has never had a problem with this. It saves her a tremendous time during the holidays to know that the pies are all done and ready to be put in the oven at a moment's notice... 

...and I can attest that my mother makes damn good pies...

So, when you've finished with all the jellies and jams your family will hope to eat... and all the fresh fruit that you've put into jars, make a few pies with the remainder.. come the holidays or that random weekday or snowy weekend, you'll be glad you did.

Basic Two Crust Pie Dough
      from my 1982 Betty Crocker Cookbook

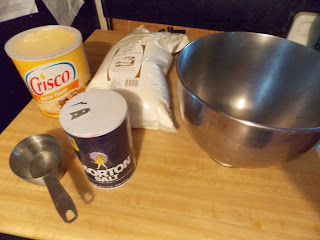
1 cup shortening (I like butter flavored)
2 2/3 cups all purpose flour (or pastry flour)
1 tsp salt
7-8 Tbsp cold water

Pie crust is basically the same regardless of what recipe you use. Its a simple four part ingredient recipe that includes the flour, a fat and salt to taste. Water finishes it up to bind it.

In a mixer put in your flour, salt and fat. Mix until it resembles peas. Put in just enough water to make the pastry pull away from the sides. Take it out and put it in the refrigerator for about 30 mins.

Cut the pastry in half and roll out the dough to fit the bottom of the pan. Transfer the dough to the pan by rolling a portion of it over your rolling pin and gently placing in the pie plate. poke holes in the dough with a fork.

Fill with your filling of choice. If you are making a cream filling, then you would make that at the time of cooking as they don't freeze well. With berries or fruit you can put those together now.  Your basic fruit recipe is as follows:


Poke holes in
pie bottom to prevent it from getting soggy with
fruit juices.

Fresh Fruit Recipe:

1 to 1 1/2 cup sugar (to your taste)
Fresh Fruit
1 tsp extract flavoring of choice
(rum, vanilla, butter, nut are basic choices)
Spice of choice
Butter


Don't forget to dot with butter.


Fill your bottom pie crust and do not forget to add the butter as that will help your pie taste delicious and help to bind the filling. Add your top crust and make sure to cut slits in it to allow the steam to rise from your baking fruit. Now simply wrap well with tin foil and make sure to label it well. Your pies will taste extra fresh because you created them when your fruit was at the peak of freshness. Happy Pie Day Everyone!


Don't do an egg wash or milk wash until you get it out
and are ready to bake pie. Seal tight and it could
last as long as a year.


**UPDATE: We ate these pies this weekend, yes you read that, almost a full year from when I original made them. I can vouch for the fact that they tasted as good as the day I made them! So, when you are completely out of ideas for how to preserve that last bit of fruit and you are sick to death of making jam and jelly, consider pie. You'll be so glad when the holiday season comes and your dessert is waiting in the freezer just ready to pop into the oven!
 

Monday, September 23, 2013

Jenny's Homefront Strategy: Peggy C's Grape Juice Recipe

Peggy C's Grape Juice Recipe


Homemade grape juice tastes great and costs about sixty cents a jar!

Have you priced out the cost of grape juice in your average store? Have you looked at the list of ingredients? Pricing out grape juice at my local grocery store this weekend, the price was $3:49 per 2 quart size and I'm sure if I checked the ingredient list it would start with something like, "High Fructose Corn Syrup".....we can do better... a lot better....

Growing up we had a family friend by the name of Peggy C. Peggy and my mother would go horseback riding and volunteered their horses and their time to do "Handicapped Horseback Riding" which pared up physically challenged children with horses and they would give the children a ride. The children, some of whose bodies were in a permanent state of hyper or hypo extention, would, most of the time, instantly relax when placed upon the animal. Peggy worked in the Flint schools as a therapist for kids.

Peggy shared with my family a recipe that I can every year. It's simple, having only three ingredients, and the taste you'll recognize as it tastes very near the popular brands you fnd in your local grocery stores. The difference? You recognize everything that goes into it and factoring the cost of the grapes and the sugar, the costs averages around $.60 per quart or a savings of  $2.29 over your grocery store brand (and that was the store brand, not a national brand!).

My yield was about 28 quarters for each 8 quarts of grapes I purchased. Unfortunately I didn't know what my yield would be and purchased 32 quarts of grapes. This ended up being a 12 hour canning marathon that cumulated in approx. 60+ quarts of grape juice and about five pints of grape jelly. Still, I did 24 jars last year and they were gone by February. I'm scaling the receipe below to 1 quart so you can plan according to your needs.


One basket of these yielded about 28 quarts!


Peggy C's Grape Juice

(Yield=1 quart of juice)                         
1 cup Concord Grapes
1/2 cup of sugar
Hot boiling water to fill the quart jar.

For each quart jar add 1 cup grapes and follow with 1/2 cup of sugar. Fill jars within a 1/2-1/4 inch of the top.


To can, boil your lids in a separate small saucepan filled with water. After filling jars, take a knife and stir a bit to release any air bubbles. Wipe down the top of the jar lids with a slightly damp, clean dishrag. Using tongs, lift one jar lid per jar, center it on the jar and quickly twist on a canning lid.


Fill with hot water.


Wipe down the lid with a damp towel....


Center lid and quicly screw down canning ring.


Repeat for the number of jars you are making. Then place it in your canner making sure your water covers the jars by at least one inch. Boil or process for 30 mins. Remove from the canner with a jar lifter and carefully place each super heated jar on a kitchen towel on your kitchen counter or butcher block. (I wouldn't put them on a metal surface or marble to prevent thermal shock as they tend to run a bit colder than a counter.)


Jarred grape juice nestled in the pressure canner waiting processing.


Repeat the process as needed. Grape juice tends to be ready in about six weeks or when you notice most of the grapes have lost their color and dropped to the bottom of your can. If you notice the sugar on the bottom of the jar, simply shake it before using.


Enjoy filling your pantry with the gifts of summer and fall! There is nothing like cracking open your own products knowing that YOU manufactured them and can pronounce every ingredient in them. It's those little luxuries that make you smile as you drink your grape juice on some snowy January day. Happy canning!


Monday, September 16, 2013

Bruchetta Butter

Please forgive the hiatus... the boy has been home most of the summer and our allotment of time on the hotspot for each month has been gobbled away. But  (::YEAH::) school is back in session and life is back on an even keel again....

So, at last we met we were talking about time saving butters and we've already talked through the Scampi (yum) butter and now I owe you the Bruchetta butter (even yummier yum!) The Bruchetta butter is very easy and makes quick work of dinner.

Bruchetta Butter                                          

2 sticks butter
1/4-1/2 cups sun dried tomatoes
NOT packed in oil
1 bunch basil (maybe 3 Tbsp fresh)
1 1/2 Tbsp dried onion
2 tsp dried garlic powder

First chop your basil and your sun dried tomatoes together very finely into a nice dice.


Then add this, your butter and the remaining ingredients in the mixing bowl.


Mix.


Package in wax paper and seal in a plastic bag so it doesn't loose moisture in the freezer.


Bruchetta 

This is a modified recipe of one I found on the web about a year ago.
I've changed a few things out to meld with my family's likes. Unfortunatlely,
I used homemade bread that wasn't that photogenic so no pictures but it was delicious!

1 Italian loaf or French loaf cut lengthwise
4-5 strips of bacon
mushrooms
kale, spinach, whatever leafy greens you like, chopped fine
(in a pinch I've even used lettuce)
If desired, fresh tomatoes (not necessary as
this is the reason you put in  sun dried tomatoes)
mozarella cheese
Bruchetta Butter

Fry up your bacon in a skillet but don't drain off the fat.
Remove bacon to a lined plate to drain.
Add mushrooms to your bacon grease and cook until
mushrooms turn color and appear cooked. Add chopped
greens. Add a good 1" to 2" sized round of your Bruchetta
butter and melt into a nice sauce in the pan. Add crumbled bacon.
Remove from heat.

Put your lengthwised cut loaves on a cookie sheet under
the broiler of your oven on low for about 1-2 mins to just get
a "toasted" light crust. The main objective is to make it solid
enough to hold the topping. Add the mixture from the skillet,
dividing it between the two toasted bread loaves. Add cheese
and put back under the broiler for 2-5 minutes until cheese
has melted and is to desired point of toastiness.
Remove from oven, cut into chunks and enjoy! YUM!